How to add a Google Workspace source?
The steps below explain how to add a Google Workspace account to Syncgene. For more detailed explanation, check Perform Google Workspace Domain-Wide Delegation of Authority.
Complete these steps below:
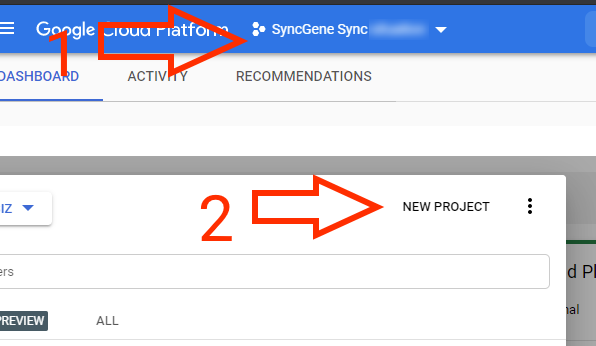
- Go to Google API Console.
- Create a project that is only intended to be used for SyncGene synchronization.
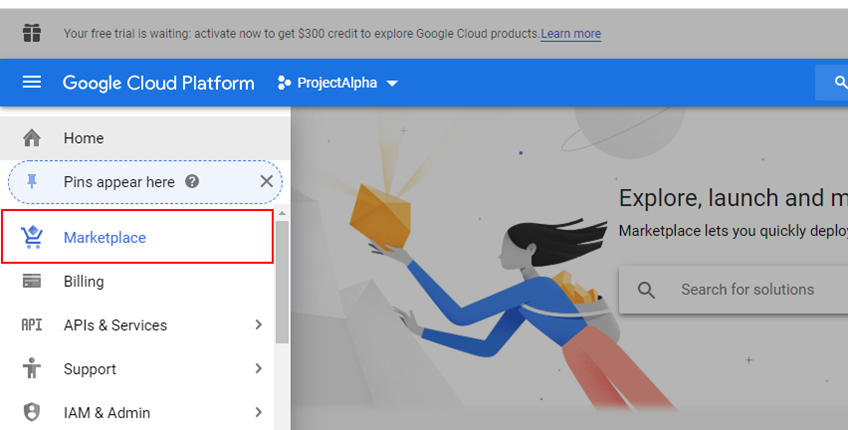
- Go to Marketplace with the project created for SyncGene synchronization selected.
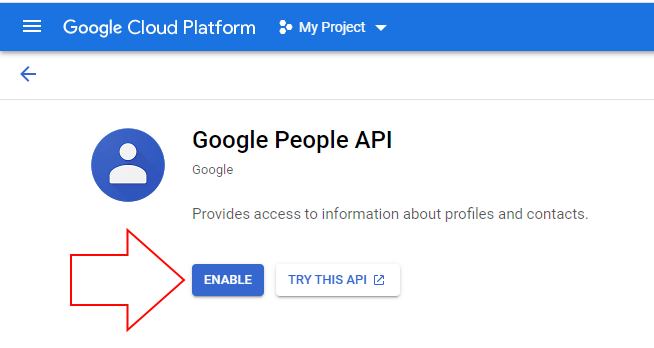
- Find “Google People API” and enable it
- Repeat steps 2,3 and enable all of these APIs:
- Admin SDK API
- Google Calendar API
- Tasks API
- Google Drive API
- Open the Service accounts page. If prompted, select a project.
- Press “Create a Service Account”, enter a name and description for the service account. You can use the default service account ID, or choose a different, unique one. When done click Create.
- The Service account permissions (optional) section that follows is not required. Click "Continue".
- "Grant users access to this service account(optional)" section that follows is not required. Click "Done".
- On Services accounts list, make note of your newly created Service account "Client ID". Once you made note of Client ID, press "
 " next to service account (in "Actions" column) you created, and select "Manage keys".
 - Click "Create key".
- In the side panel that appears, select the format for your key: JSON is required.
- Click Create. Your new private key pair is generated and downloaded to your machine; it serves as the only copy of this key. The downloaded JSON file will be required in future steps.
- Click Close on the Private key saved to your computer dialog, then click Done to return to the table of your service accounts.
Delegate domain-wide authority to your service account.
The service account that you created needs to be granted access to the Google Workspace domain’s user data that you want to access. The following tasks have to be performed by an administrator of the Google Workspace domain:
- Go to your Google Workspace domain’s Admin console.
- Go to Main Menu>Security>API controls.
- In the Domain wide delegation pane, select Manage Domain Wide Delegation
- Click Add new.
- In the Client ID field, enter the client ID obtained from the service account creation steps above.
- In the OAuth Scopes field enter the following scopes required for SyncGene synchronization:
- Click the Authorize button.

https://www.googleapis.com/auth/drive.appdata, https://www.googleapis.com/auth/tasks, https://www.googleapis.com/auth/contacts, https://www.googleapis.com/auth/calendar.settings.readonly, https://www.googleapis.com/auth/calendar.events, https://www.googleapis.com/auth/calendar, https://www.googleapis.com/auth/admin.directory.orgunit.readonly, https://www.googleapis.com/auth/admin.directory.user.readonly
Please note - every scope must be specified even if you do not need it for your use case.
Once you completed the steps above, you need to configure Google Workspace account on SyncGene:
- Go to add Google Workspace source page.
- Upload JSON file you downloaded during Google Workspace configuration.
- Enter email address of one the admins responsible for managing your Google Workspace account
- Press "SUBMIT"
You are finished! You can now use the Google Workspace source to create SyncGene accounts and assign sources.
For latest instructions, check out Perform Google Workspace Domain-Wide Delegation of Authority
If you have any questions, you can write us an email, contact us via live chat, or call via phone: +1-202-747-0888.